【複数データ取得APIの実装】Go言語でのAPI開発 | 実践的な学習から実装まで⑤

たけのこ
こんにちは!たけのこです。
今回も引き続き、Go言語を使用したAPIの実装方法について解説していきます。
前回は、データ更新APIの実装について解説してきました。
今回は、その記事の続きで複数テーブルを結合して、指定したIDに紐づくデータを取得するAPIの実装について解説していきます。
実際の現場でも実装することが多いので、覚えておいて損はないと思います!
では、早速行きましょう!
目次
スポンサーリンク
Step 1:domain層の実装
事前に「Users」「Orders」「Products」の3テーブルを用意していたと思いますが、各テーブルに対応する構造体を作成していきます。
(Userテーブルは過去に実装しているので、省略します。)
package domain

type Order struct {
	OrderID   int     `json:"order_id"`
	Quantity  int     `json:"quantity"`
	OrderDate string  `json:"order_date"`
	Product   Product `json:"product"`
}
package domain
type Product struct {
ProductID int `json:"product_id"`
Name string `json:"name"`
Description string `json:"description"`
Price float64 `json:"price"`
}Step 2:repository層の実装
指定したuser_idに基づいて3つのテーブルを結合し、データを取得するクエリを実行するリポジトリを作成します。
package repository

import (
	"database/sql"
	"myApiProject/internal/domain"
	// ↓の1行をimportに追加
	"strconv"
	"strings"
)

/*
*  ~ 前回までのUpdateUserロジック ~
*/

// ここから下のコードを新たに追記
func (repo *UserRepository) GetUserDetails(userID string) (*domain.User, error) {
	// クエリ準備
	query := `
        SELECT u.user_id, u.name, u.email, u.password,
               o.order_id, o.quantity, o.order_date,
               p.product_id, p.name, p.description, p.price
        FROM Users u
        LEFT JOIN Orders o ON u.user_id = o.user_id
        LEFT JOIN Products p ON o.product_id = p.product_id
        WHERE u.user_id = ?`

	// クエリ実行
	rows, err := repo.db.Query(query, userID)
	if err != nil {
		return nil, err
	}
	defer rows.Close()

	var user domain.User
	var orders []domain.Order

	// 取得結果を準備
	for rows.Next() {
		var order domain.Order
		var product domain.Product

		// 取得結果を各構造体に格納
		if err := rows.Scan(&user.UserID, &user.Name, &user.Email, &user.Password,
			&order.OrderID, &order.Quantity, &order.OrderDate,
			&product.ProductID, &product.Name, &product.Description, &product.Price); err != nil {
			return nil, err
		}

		order.Product = product
		orders = append(orders, order)
	}

	user.Orders = orders
	return &user, nil
}
ちょっと複雑なので、ザックリ解説すると、
- 実行するSELECTクエリを発行し、query変数に格納。
- クエリを実行し、rows変数に結果を格納。
- 取得したデータをfor文で1行ずつ読み取り、各構造体に格納。
- 各構造体に格納していたデータを
「User←Order←Products」の形になるように格納。
というような処理を行なっています。
Step 3:usecase層の実装
ここは、前回とほぼ同じとような実装になります。
package usecase

import (
	"myApiProject/internal/domain"
	"myApiProject/internal/repository"
)

/*
*  ~ 前回までのUpdateUserロジック ~
*/

// ここから下のコードを新たに追記
func (uc *UserUseCase) GetUserDetails(userID string) (*domain.User, error) {
	return uc.repo.GetUserDetails(userID)
}
Step 4:handler層の実装
こちらの実装もGetUserメソッドと、ほぼ同じです~
package handler

import (
	"encoding/json"
	"myApiProject/internal/domain"
	"myApiProject/internal/usecase"
	"net/http"
)

type UserHandler struct {
	useCase *usecase.UserUseCase
}

/*
*  ~ 前回までのUpdateUserロジック ~
*/

// ここから下のコードを新たに追記
func (h *UserHandler) GetUserDetails(w http.ResponseWriter, r *http.Request) {
	userID := r.URL.Query().Get("user_id")
	if userID == "" {
		http.Error(w, "User ID is missing", http.StatusBadRequest)
		return
	}

	userDetails, err := h.useCase.GetUserDetails(userID)
	if err != nil {
		http.Error(w, "Internal server error", http.StatusInternalServerError)
		return
	}

	w.Header().Set("Content-Type", "application/json")
	json.NewEncoder(w).Encode(userDetails)

}
Step 5:ルート設定
あとはいつも通り、URLを設定します。
package router

import (
	"database/sql"
	"myApiProject/internal/handler"
	"myApiProject/internal/repository"
	"myApiProject/internal/usecase"
	"net/http"
)

func NewRouter(db *sql.DB) *http.ServeMux {
	repo := repository.NewUserRepository(db)
	useCase := usecase.NewUserUseCase(*repo)
	userHandler := handler.NewUserHandler(useCase)

	router := http.NewServeMux()
	router.HandleFunc("/user", userHandler.GetUser)
	router.HandleFunc("/user-update", userHandler.UpdateUser)
	//↓の1行を追加
	router.HandleFunc("/user-details", userHandler.GetUserDetails)
	return router
}
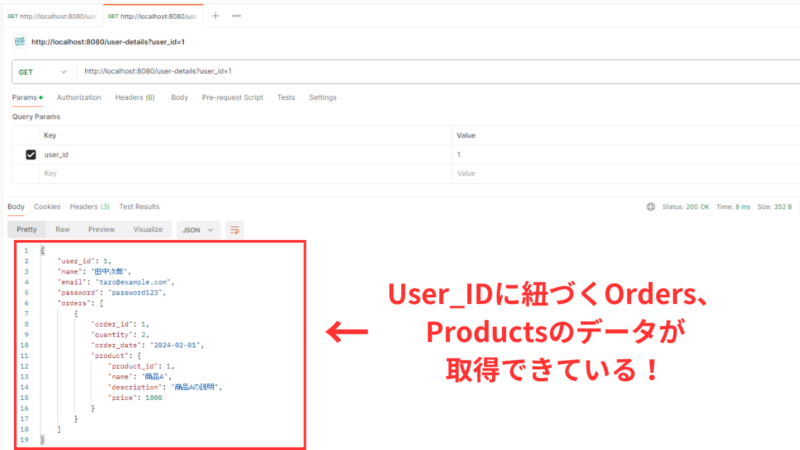
実装したAPIの実行!
では、最後に実装したAPIをPostmanから呼び出してみましょう!

さいごに
今回は複数のデータを結合して取得するAPIの実装方法について解説しました。
クエリ自体はJOIN句でテーブル同士を結合するだけなので、そこまで難しくはありませんが、データ構造がちょこっとだけ変わるので、そこだけ注意ですかね~
というわけで、今回はこの辺りで!ありがとうございました!
スポンサーリンク
ABOUT ME

